Showing posts with label THINGS I'VE MADE. Show all posts

6.03.2011

Things I've Made: Ruffle Tote Preview!


Hey y'all. Happy Friday! I wanted to share with you what I've been up to lately in my crafty corner of the world.
Ta da! Check out my ruffle tote! This is a sneak preview to the version I'll be adding to my shop very soon (the pattern is still a work-in-progress at this point, but it's very close to the way I want it!)

What do you think? This was made of a brown heather 100% linen outside with a brown/white swiss dots 100% cotton interior.

If you could have one in any color, which color would you choose?

Happy weekend ♥

4.22.2011

Granny Square Blanket of Epic Proportions

Actually, it's about the size of a large lap blanket, BUT! It is made of one big @ss granny square, so Epic-level Granny Square blanket it is. 100% Patons wool yarn in a plethora of warm colors. Looks pretty nice on our sofa, if I do say so myself. Wool is quickly becoming my favorite fiber ever, and that's without being swayed by the cuteness of sheep, I swear.

10.31.2010

Spooky Scary Happy Halloween a la Mildred Hubble

{The Worst Witch, Mildred Hubble}
Happy Halloween everyone! Hope everyone enjoyed the very last day of October, 2010. Ours was a busy, fun, candy-filled one, that's for sure :)
 {The Grand Wizard}
And, of course, I had to share a couple pics of  how our costumes from The Worst Witch turned out. Personally, I think they turned out pretty well! And Giuseppe, the ex-lamb. He was a grass-fed guy who used to live on an Ohio farm. Then Mr. M placed an order. Giuseppe made a great stew and his head scared a. lot. of. people. And yes...it's real, despite the 6 year old girl who told her friends, "Oh, don't believe all that nonsense." I didn't have the heart to tell her otherwise.

{Giuseppe's head. Ew.}
Here's to turkeys and holiday shopping! November. Can you believe it?!

10.07.2010

Pumpkin Patch Crochet-Along...Update!

 
 Waiting for faces.
I've been having so much fun crocheting pumpkins for Itsy Bitsy Spider's Pumpkin Patch Crochet-Along, as you can tell by my slowly-growing pumpkin patch!

These first two are still waiting for faces...the one on the left was modified from the original pattern. The one on the right was from the original pattern.

Oct-O-Lantern!
And of course, I couldn't resist a little kawaii cuteness + a strange sense of humor ;) What happens when you cross an octopus with a pumpkin? You get an Oct-O-Lantern, of course!

8.27.2010

For the Birthday Girl: Seersucker Sundress + Black Apple Doll

 black apple doll + gingham seersucker sundress

I love my birthday, partly because it is always a magical day, but also because I share it with two fantastic family members -- my Unc D and niece Lily! Lily Pop turned 4 this year, which is just a perfect age for handmade gifts. This year for Lily, I made a darling blue and white gingham seersucker sundress and a plush doll in a matching dress, adapted from Emily Martin's Black Apple doll pattern (so generously shared on Martha Stewart.)Vintage buttons, a tiny satin bow, and felt mary janes just add to the fun.

8.09.2010

31 Years.


Today is my birthday. The big 3-1. That is just...weird. It sounds so old! ha! It's been a tremendously fantastic year for me; chock full o' life-changing events, happy times, growth, and laughter. One more year to relish in the idea that I don't look my age, though I haven't really the foggiest of ideas as to what a thirty-something should look like...I do have an inkling that I'll be clinging to that idea for years to come, despite the more-than-a-dozen glittery silver hairs and tiny crow's feet taking residence. (Admittedly, I think crow's feet make for "smiling eyes", so I don't mind them much at this point.)

To celebrate my birthday this year, a few of my nearest and dearest  met up with me at our favorite, local taco truck this past Friday (where I killed 2 al pastor tacos and 2 asada tacos. YUM!) Then Mr. & Mrs. M came over for cake, blueberry fro yo, and board games (P.S. Outburst is a new favorite!)

First, let me say that I made myself a lovely little birthday cake this year and was very excited. It was a white cake (with a bit of brown sugar because I ran out of white), cherry-vanilla filling, and pink vanilla frosting with clear sugar sprinkles, topped with a vintage wooden spool for a candle holder and handmade bunting on the front. It was pretty, let me tell you what! But...disgusting. Which I find endlessly hilarious. Everyone ate it, said it was good, and couldn't understand why I didn't like it, but whether they meant it remains to be seen. I didn't even finish my piece, I thought it so bad. That's what I get for using a new recipe. Better for me than on someone else's birthday!

So, there you have it. My birthday cake story. Today, I think we'll celebrate quietly with hot dogs and mac-n-cheese for dinner and, perhaps, a scoop of  Jeni's to make up for my cute-yet-inedible birthday cake.

6.29.2010

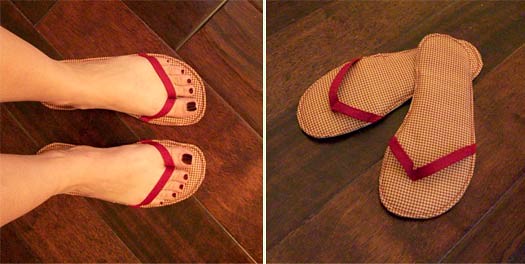
Latest Projects: Flippers Summer Slippers

 Loving my latest "flippers" summer slippers (flip flops + slippers = flippers. Clever, eh? 100% my momma. Thanks mom!) This is the 4th pair of flippers I've made and certainly not my last. The fabric shown is a repurposed thrift store fabric...I wish I had bolts of the stuff!

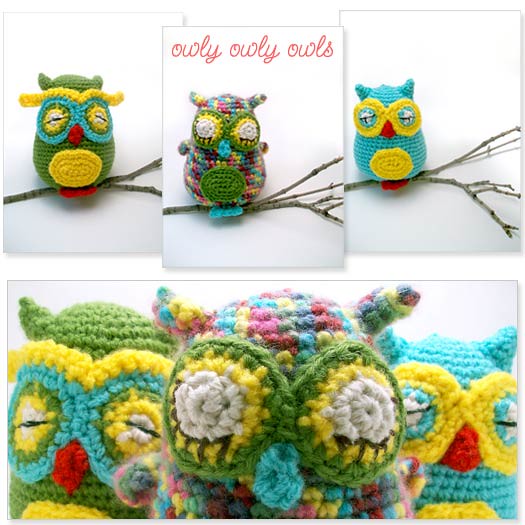
Owly Owls

owls

I'm loving creating these cute little owls for the Great Owl Crochet-Along. Here are my first three...one happy little owl family :) Want more? Check out all the owls in the Great Owl Crochet-Along Flickr group!

6.11.2010

Freebie Friday: Summer Flip Flop Slippers

flip flop slippers

Remember how I mentioned on Monday that, before summer was over, I'd like to make these completely darling flip flop-style slippers using Liz @ Lady Harvatine's pattern? Well, I made some that very evening. And I want to make gobs more. They are so great for shuffling around the house! When it's hot outside, I'm a barefoot kinda gal, but my feet get Dirty with a capital D! Ew! These little fellas fix that right up. Of course, I have lots of plans to tweak the pattern, but this is my version of said slippers. Which I call 'slippies' and usually scoot around and do a little dance, wiggling my arms like a goon. What can I say? It's what I do.

Happy weekend, peeps. I'm meeting a new friend for coffee later. Yippee! Can't wait!

5.29.2010

DIY: Martha Stewart Crepe Paper Black-Eyed Susans

I am a masochist for Martha Stewart paper flower kits, apparently. Or perhaps enough time has lapsed that I forgot how challenging they are? Anywho. I did another. It was a doozy, but I love crepe paper enough to take on round 2 of the paper flower challenge.

Before...
A cover shot of the kit package and a professional pic of what the final should could maybe look like if we were all as gifted as the creators in Marthaville...

After...
Voila! My stems. What do you think? I tied a pretty white grosgrain ribbon onto the mason jar and gave this pretty bunch of crepe paper black-eyed susans to my momma for Mother's Day. She was happy :)

Words of caution...
It takes. For. Ever. It looks like this when you open the package:
Copious amounts of cutting is involved. Sharp scissors are your frienemy on this project. I did it in stages. First, all the cutting out of the pieces. Then, making the brown centers and floral taping them to the stems. After that, it was assembly line of petals, small leaves, and large leaves. Stretch. Fan. Roll. Fold. Fuss. Repeat eighteen times. They turned out surprisingly lovely and the crepe paper is very high quality. If anyone knows of a resource for buying thick European crepe paper, I'd be your BFF if you share a link or two. Thanks!

5.25.2010

My Garden Grows...with Impatiens


Who doesn't love a little pun now and again? On Sunday, I went bonkers and planted my garden. I had so many plants in my cart at the local garden center that one man told his wife, "Whatever she gets, we should get." I guess I looked the part because, in all honesty, I don't have a clue what I'm doing. When I said that to Bubs? His response: "If you get in in the ground, you're doing it right." What a novel idea :)

Here's everything I planted:

· red + orange impatiens in the front box planters
· hot pink, pale 2-color pink, and pale violet impatiens in the back box planters
· pineapple mint, parsley, cilantro, sweet basil, + lavender in a big old metal planter
· green beans, leeks, Mr. Stripey heirloom tomatoes, cherry tomatoes, cucumber, Scotch Bonnet peppers, red chili peppers, green bell peppers, spinach, lettuce, and a partridge in a pear tree. Ok. That last bit was a joke :)
Oh, and we found two toads (frogs? I don't know the difference.) in our yard -- 1 near the deck stairs + 1 hopping near the fence. When it jumped, I jumped. Bubs wouldn't let me try to touch it, the fraidy cat.


 I wonder why they've taken up our yard as their home? Let's hope they eat mosquitoes :)

What fun things have you planted in your garden this year?

5.21.2010

Freebie Friday: Great Owl Crochet-Along!


I love Delightful Blogs (and have even considered submitting OMW! to their directory), but I don't spend nearly the time I should checking out new blogs to follow. There are too many! It's overwhelming! Today, however, I decided to peep some new folks' blogs and I'm so happy I did because it lead me to Strumpets Crumpets (isn't that the best name?) and Itsy Bitsy Spider -- and they just so happen to be sponsoring an amigurumi crochet owl making extravaganza with an optional swap. Holy cow, how quickly could I sign up for that?! Becky (of Strumpets Crumpets) admits that she is an amigurumi newbie herself, so never fear if this is the first ami critter you've ever made...so long as you know basic crochet stitches (single, half double, & decrease specifically), you're good to go. Sign ups end on May 30th, so hurry over and sign up if you're interested! Also, the swap is optional -- you just need to get your finished owl over to Becky by August 1. There's even a Flickr group set up to share your owlie with the world!

What's even better? Karla of Itsy Bitsy Spider is providing the owl pattern for free to everyone who signs up before the May 30 deadline. (And who doesn't love a free crochet pattern?! Thanks Karla!)

So pop on over to Strumpets Crumpets or Itsy Bitsy Spider to sign up :)

Have a happy weekend!

xo
eve

4.30.2010

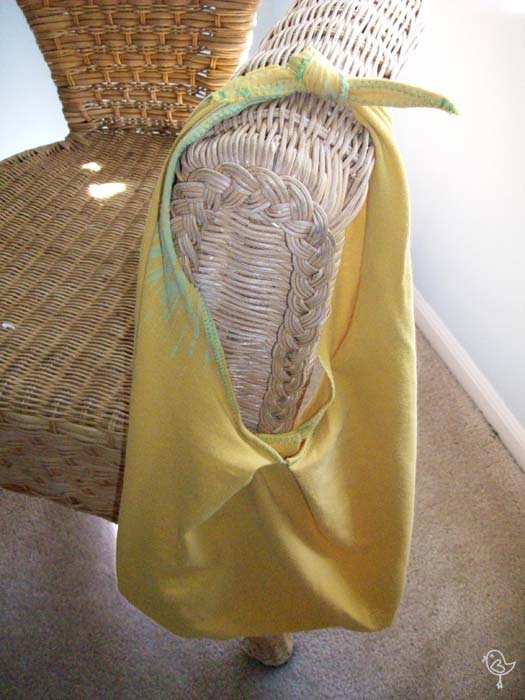
Freebie Friday: Upcycled T-shirt Tote Tutorial

Upcycled T-Shirt Tote


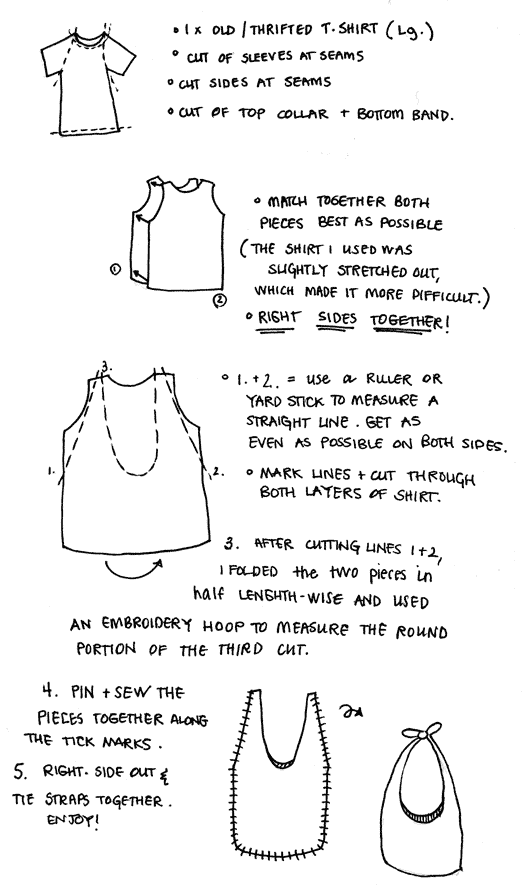
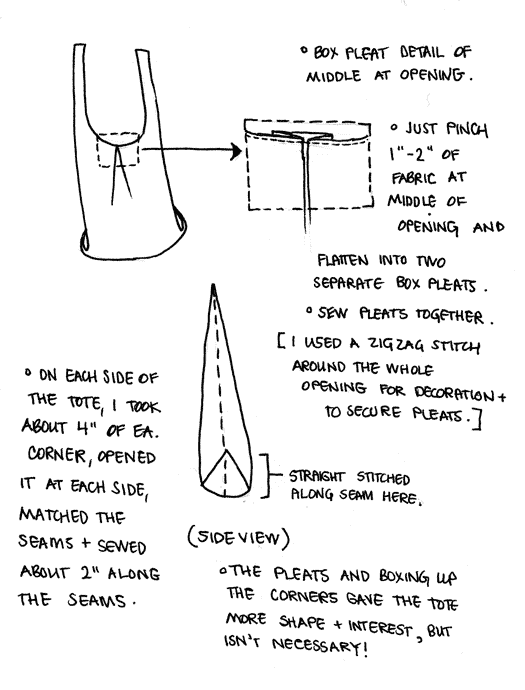
My sister and I love, love, LOVE to brainstorm. Whether it's a new little something to sew, products to source, or packaging, she has the eye for design, an ear to listen, and one heck of a contributing voice! Out of one of those sessions comes this fun, cheap, and easy DIY project. Turn any old t-shirt into an easy tote bag - perfect for the beach, playground, or park. I don't have much experience in pattern making, so I'll do my best to walk you through the tutorial...please ask questions if something's unclear. Enjoy :o)


tshirt-tote-tute1
Above, you'll see the basic instructions for my t-shirt tote bag. 
Below, I've listed a few extra details I've done to jazz up my finished tote (top image.)
tshirt-tote-tute2


Have you used this tute to make a tote of your own? I'd love to see your finished product! Email me at reevetobe{at}gmail{dot}com and I'll happily share your photos with the world!

xo,
Evelyn

p.s. This tutorial + pattern are for your personal use only, please. Share and share alike, but please give me credit when reposting!

4.02.2010

Freebie Friday: Amigurumi Bunny Egg Cosy

These little cottontails will be making their way to my two nieces this Sunday, but instead of real eggs, they'll be accompanied by chocolate Cadbury's eggs (which are just way more fun to give!) Not bad for about an hour per bunny, a bit of scrap yarn, embroidery floss, and plaid grosgrain ribbon. I used Lion Brand Yarn's free pattern found here. (*note: you do have to register to view their patterns, but it's more than worth it. No spam and tons of great free projects!)

Prior to this project, I had never made pom-poms before, but I really liked how they turned out. I mean, what's a bunny without a pouf for a tail? I used Bella Dia's easy peasy tutorial here for help.

I'm signing out for the weekend. I wish for you this weekend a renewal of spirit, peace in your hearts and smiles on your faces. Please do not let the sentiment of the season be lost in chocolate eggs and plastic grass. Rebirth, renewal, and resurrection all go hand-in-hand. Whether we're talking about nature or faith, it's really all the same language. Here's to enjoying the friendships you have, hugging loved ones and giving thanks!

3.23.2010

Make Do & Mend: Patching Holes

For quite awhile now, I've been thinking about my spending patterns, what they mean, the impact they have on my household and the global picture, what it means to truly "make do and mend" and, to go one step further, how to apply those philosophies to my every day life.

In the past, I have been guilty of replacing items with brand-new because I was tired of the old one (*guilty of following flash-in-the-pan trends and not investing  in classic foundation pieces). I've also donated clothing that was ill-fitting before ever trying to alter it to fit me properly (*guilty of not seeing the value in already-owned pieces and getting creative with my seamstress abilities) and, lastly, I recognize that, in the past, I've put way too much value on the 'new' instead of saving my money and making do with what I already own. Well, I'm proud to say that, for me, those wasteful days are over. From now on, I'm going to apply the philosophies of generations past and make do and mend. It's not going to be any walk in the park, but I hope that checking in with my progress will inspire you to tackle some projects of your own and share tips as we discover them. I hope you'll join me in "using it up, wearing it out, making it do and doing without"!

Here's what I did last week:

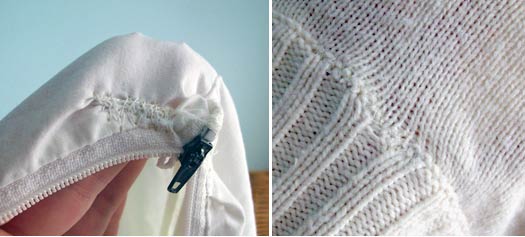
1. Sewed up a tear and patched two holes in a vintage pillowcase liner.


Make Do and Mend 1

2. Sewed up two tiny holes in a $2 thrift store sweater I recently bought.

3. Finished an elastic skirt made from a new cotton sheet and white grosgrain ribbon. Added some pockets using Susan at Freshly Picked's tutorial here. (Not the greatest pic, but I had to share it. I love the pockets!)

4. Made a notebook tote for my best friend's son's 2nd birthday (I'll post pics after I give it to him!)

What's up next on the Make Do & Mend list (and this isn't just limited to clothing, folks!):

- Hem about 6 pairs of pants
- Make some kind of window covering for spare bedroom window
- Pick up & strip wood benches from my grandma's old house (hopefully pick up over Easter weekend...)
- Reinforce a seam on a pair of suede flats (holes already awled and ready for stitching)

What's on your Make Do & Mend list?

3.16.2010

El Cheapo Chic: My $1 Burlap Wreath


You remember my sharing this great project on how to make a burlap wreath? Well, I decided to finally make my own. At first, I followed the tutorial more closely, using 6 strips of burlap roughly 3-4" in width and 36" in length, but it didn't look as dense as I had hoped once it was "scrunched" onto the wire. Instead, I took all the burlap off the wire, halved the width of the strips and skewered it back onto the wire. The result was much better for my tastes. For now, I'll hang it on the back door in the kitchen. I think the burlap looks nice against the white walls.

I have a fun and busy week ahead of me...get to visit with Sissy (it's been too long!), getting my hair done, St. Patrick's Day, a lunch with my ladies on Friday, and more work on Hello Magpie (I found some super cutie vintage additions and worked out some great handmade products this past week. Yahoo!)

So how's your week looking? Anything fun on your agenda?

Oh...BTW. Have you tried TeuxDeux yet? I'm slowly saying good-bye to my gazillion Post-it notes, it's THAT GOOD! Making my life more organized, one day at a time :)

1.18.2010

Adventures in Macaronage

 {First homemade macarons. Peanut butter + blackberry jam. Delish!}

I have a macaron obsession. They are lovely little bites of sweet and even better to eat. I dream about Pistacia Vera and their signature macarons, with their cheerful colors and mouth-watering flavors like cocoa cassis and Madagascar vanilla bean, but sometimes I dream bigger. Ingredients like rose, lavender, anise, blood orange, hazelnut and white chocolate linger in the back of my mind. Oh, the possibilities!

But I was nervous. I'm a bit of a perfectionist and anyone who knows about the macaron-making process understands that even the experts can fail a batch or two. No pressure there, right? Well, Sunday was the day. In honor of Helen (of Tartelette fame), who did a workshop on her fabo macarons at The Broke Socialite's SugarComa in Atlanta over the weekend, (not even going to go into how amazingly jealous I am to have missed it!!) I tackled my very first attempt at macarons. And I didn't just do any ol' recipe, kiddies. This was Helen's own PB+J macaron recipe...I mean, if you're going to fail, make it a delicious fail, right?

Prepped all of my ingredients first. I chose a 50/50 unsalted peanut + whole almond mixture and ground them together in the processor, rather than using almond flour. This was partly due to the difficulty in finding almond flour near me and upon Helen's suggestion.


I spared you the shots on what a disaster my kitchen became (confectioner's sugar is messy!) and went right for the piped macarons. Though I went in and carefully folded and blended the dry ingredients into the egg white peaks, I know I should've backed off just a bit, perhaps over-folding just slightly. Also, my piping tip was too big (used what I had...a 1" tip.) By trays 5 & 6, I had the sizing and piping technique a bit better and those macarons turned out a much better shape and size. It wasn't critical for me on this first try, but I'll invest in another smaller piping tip (my garbage disposal ate my last one, boo.)

Here is one tray, resting from 5 minutes in the oven at 200°F, before the 7 minutes at 375°. I thought they had spread just a bit too much and was worried they wouldn't rise or form a 'foot' at all at this point.


Though they rose more than I had anticipated, I still think a few less folding strokes early on would've produced a bit taller macaron. However, the consistency is pretty decent and they are really tasty! FYI, to compliment the peanut butter filling, I used a seedless blackberry jam, which was a great choice. The color is pretty and the taste is fresh and organic. Perhaps they aren't the prettiest things ever, but they taste really good! I forgot to sprinkle a bit of crushed peanuts on top. Next time, I'll do that to make them look a bit more finished and add a little crunch.

All in all, I'm really happy with the result. Practice will definitely improve the results. Bubs did freak a little when he ate one and that's nothing short of a victory in my book. I learned a lot, feel accomplished and had fun but more than that, I lost my fear of trying out something new. This is just the beginning, I can tell you that much. Maybe this summer it will be an attempt at a macaron ice cream sandwich à la Jeni's Ice Creams :)

1.15.2010

{freebie friday} Retro Recipe Cards

OK everyone, it's time to take a quick look back into recent history. Remember this post? The one about the small hand I played in my bridal shower with the recipe cards I designed? I'm not sure I really, truly explained what a huge success it was for me. Though I haven't started the creation of my own family recipe album quite yet, all the recipes are in a tidy stack in a beautiful basket just waiting for me. And let me tell you what...these are some really delish recipes! Bubs just made his mom's Madras Curry the other night for dinner. It's crazy good. And my mom's Chicken Parm. And her mother-in-law's Blondies. Our aunts' Treacle Pudding and Rosemary Chicken. Sissy's improved version of Grandpa's Strawberry Pie. Like I said before,with a gift like that, who needs presents? I'll cherish these recipes forever and, hopefully, one day my kids and grandkids will, too.

That got me thinking. Whether you're looking to do something similar with your bridal shower (and I can't recommend it enough), are feeling generous with your recipes or have a potluck coming up, who wouldn't prefer a cute retro recipe card over a plain piece of printer paper or a boring index card? So, just for you, I share my retro recipe card template. Just click here for the template and save to your computer.

These modern-vintage recipe cards are 3 1/2 x 5" when folded with cute dotted lines for writing out all your recipe's details. They print 2-up on a standard 8 1/2 x 11" sheet of card stock (recommended.) Trim at the black lines and you're all set!  

{note: these are for personal use only. sharing is encouraged, but please link back & give credit! © oh my word! 2009}

12.11.2009

{Negril Favorites} DIY, Jamaican-Style

I was lucky enough to learn quite a few Jamaican crafts while on honeymoon (I'm sure that comes as a HUGE surprise, right? lol!) With the help of great teachers like Nigel, Joe, O'Niel and the "school teacher", I walked away with new friends and learned so many new crafts -- tie-n-dye and lots of weaving...with palm fronds, a local symbiotic vine called 'Five Finger Wiss' and even with telephone cables from a guy on the beach. It was so much fun!

Not bad for my first try at a spiral!

Here I am with my finished tee. As many times as I've done tie dye, it's never come out that well, I swear. Everyone in the class thought I was a ringer! I was going for a sun-inspired design. It was a success! That's O'Niel in the background to my right, helping everyone dye their shirts.

My Five Finger Wiss basket - Nigel was a good teacher.

Here's my Five Finger Wiss basket. Basically, the material is a symbiotic vine that grows on many trees in Jamaica. It doesn't harm the tree, grows abundantly and dries to make a great wicker-like material, perfect for weaving! This was my favorite project of the week. Nigel was impressed with my crazy-good weaving skills. Above shows my finished basket. I did it all by myself! It now holds all my beach treasures...coral, shells and fossilized rocks. Beaut!

Helping Joe (left in stripy shirt) teach the students...he loved it!Making a palm trivet!

By the third crafts class, I was becoming known by the other guests as the "artist". It was pretty funny, actually! They were great fun to learn with...and teach, too! These two pics were taken at the palm weaving class where I made a trivet and most others made a coaster. It took forEVER to do! It took me the same amount of time (about an hour and a half) to make a 9" trivet as it took me to make my basket with Nigel. You can see some finished baskets behind me in the above photo...it took Joe and his mom about the same amount of time (1.5 hrs) to make one. They were so fast! Because the class was so busy, I did help Joe out a bit with showing people the ropes. He thought it was hilarious! His mom gave me the thumbs-up.

8.11.2009

Celebration.

To say that I had an amazing birthday weekend is a huge understatement. It was, without question, a perfect birthday. D. described it as "the kind of birthday party you hear about but never are lucky enough to go to." That's how cool it was. Intimate, happy, delicious. Perfect.

What a lucky girl I am to have such tremendously kind, thoughtful people in my life. That's the best gift I think I've ever received.


Related Posts Plugin for WordPress, Blogger...