Showing posts with label FREEBIES. Show all posts

5.08.2011

Hey Mamas...It's Your Day!

 {recycled flowers by Yoav Kotik via TreeHugger}

Happiest of happy days to every one of you awesome mothers out there! I hope your day is filled with smiles, hugs, giggles, and whatever wonderful things you can imagine.

If you happen to find some extra time on your hands today for some hands-on projects, here are a few of the latest projects on my radar...Enjoy!

Candied bacon...c'mon. How good would some candied bacon be atop a maple buttercream-frosted cuppie? Yep. I thought that might getcha!

Emeril's cayenne-candied bacon recipe via Food Network (skip the cayenne if that's not your bag)

Recycled paper flowers...let your imagine soar for sources (like the above soda box flowers). Here are a few tutes around the web as a place to begin.
 
recycled toilet paper roll blooms via Parent.com
recycled paper flowers via How About Orange
recycled magazine flowers via Little Sprinkles of Fun

 Living with Less, according to Re-Nest. OK, ok. It's not a craft, but it IS a DIY. And it comes with weekly tasks. And you end up with a tidier, more livable home environment. How does that not suck?! I started with my bedroom closet a few weeks ago and, admittedly, lost steam. But these weekly posts has my spirit renewed! I. Will. Do. This.

check out all the Living with Less articles via  re-nest | apartment therapy

Modern Quilt loveliness. I am determined to be a quilter. Sort of like a really hip, modern granny sort of quilter. Part of me wonders if I should take a class, or (like everything I do) just dive right in and figure it out. There are so many amazing mod quilts floating around the Web, it's hard not to want to make one, too!

the modern workshop quilt free pattern via oliver + s
lots of free quilt patterns via Amy Butler (big props to Ohio!)
rainbow bunting baby quilt tute via a pretty cool life (holy moly, cutest quilt ever)

12.07.2010

Feature + Giveaway at the Baby Blackbird Blog!


Things are hopping into holiday time around here, but I wanted to take a minute to thank Brandy at the Baby Blackbird blog for featuring me and hosting an (international) giveaway of a few of my favorite Hello Magpie items! Please do me a solid and visit Baby Blackbird (which is such a fantastic blog I can hardly stand it...so much cute in every post!) Once you're there, take a peek at the giveaway and enter to win :) It ends Friday and Brandy will post all the deets. Good luck + enjoy ♥

P.S. Am I the only one left who hasn't decorated a Christmas tree yet? It's up. It has my favie blue lights (to follow in my grandma's footsteps and thanks to Bubs for his mad light hanging skills), but nary an ornament in sight. Sigh. Maybe tomorrow...just maybe.

6.18.2010

Freebie Friday: The Necktie (Father's Day edition)

{img}
I got the nicest email the other day from Matt over at Tiepedia. Gotta give props to a guy doing his blogging thing, especially when it's not a tech or sports blog! It's all about the quintessential man essential: the necktie. Now, call me crazy, but I freaking love the look of a man in a necktie. It just seems right somehow. Maybe that's old-fashioned, but hey, I've been known to like all things old-fashioned.

So, as I was saying. Matt has a great post on necktie cakes, which I completely love. Definitely check it out! (Thanks for the link, Matt!)

It also got me thinking...Father's Day is Sunday. Do you want to make an extra-special gift for Pops this year? Why not make him his very own, custom-made necktie? Even dads who don't like ties would like it if you made it with your own two hands! Need a pattern? Check out Andy Gilchrist's man-friendly blog Ask Andy About Clothes for a great DIY necktie tutorial.

Happy (early) Father's Day to all the dads out there + have a great weekend!

6.11.2010

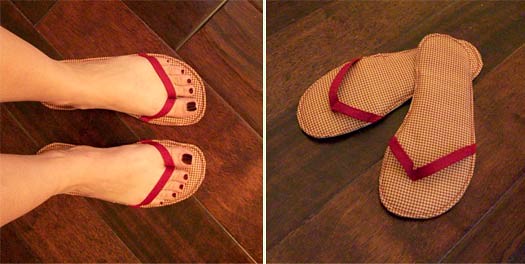
Freebie Friday: Summer Flip Flop Slippers

flip flop slippers

Remember how I mentioned on Monday that, before summer was over, I'd like to make these completely darling flip flop-style slippers using Liz @ Lady Harvatine's pattern? Well, I made some that very evening. And I want to make gobs more. They are so great for shuffling around the house! When it's hot outside, I'm a barefoot kinda gal, but my feet get Dirty with a capital D! Ew! These little fellas fix that right up. Of course, I have lots of plans to tweak the pattern, but this is my version of said slippers. Which I call 'slippies' and usually scoot around and do a little dance, wiggling my arms like a goon. What can I say? It's what I do.

Happy weekend, peeps. I'm meeting a new friend for coffee later. Yippee! Can't wait!

6.04.2010

Freebie Friday: Summer Pudding Recipe

{recipe + illustration by Johnathan Hawker via They Draw and Cook}
 The first time I had a traditional English summer pudding, I was visiting my husband's aunts, uncles, and cousins for the very first time. I was 20 and it was my first trip to England. This simple, fresh, and amazing dessert has lingered in my mind for the last ten years. This will be the summer I make one. I hope you'll try it yourself!

{recipe and photo courtesy BBC Good Food}

Here's the BBC Good Food recipe, with some changes, courtesy moi.
Ingredients:
  • 300g (10.5oz) strawberries
  • 250g (9oz) blackberries
  • 100g (3.5oz) redcurrants (if you can't find them, blueberries would be a good replacement)
  • 500g (1lb 2oz) raspberries
  • OR 2lb 12oz mixed berries and currants of your choice
  • 175g (6oz) golden caster sugar (replacements: caster sugar or regular white sugar)
  • 7 slices day-old white bread 
Directions: 

1. Bring out the juices: Wash fruit and gently dry on paper towel - keep strawberries separate. Put sugar and 3 tbsp water into a large pan. Gently heat until sugar dissolves - stir a few times. Bring to a boil for 1 min, then tip in the fruit (not strawberries). Cook for 3 mins over a low heat, stirring 2-3 times. The fruit will be softened, mostly intact and surrounded by dark red juice. Put a sieve over a bowl and tip in the fruit and juice.

2. Prepare the bread: Line the basin with cling film (plastic wrap) as this will help you to turn out the pudding. overlap two pieces in the middle of the bowl as it's easier than trying to get one sheet to stick to all of the curves. Let the edges overhang by about 15cm (6 in). Cut the crusts off the bread. Cut 4 pieces of bread in half, a little on an angle, to give 2 lopsided rectangles per piece. Cut 2 slices into 4 triangles each and leave the final piece whole.

3. Build the pudding: Dip the whole piece of bread into the juice for a few secondss just to coat. Push this into the bottom of the basin. Now dip the wonky (I swear it really says 'wonky' in the recipe) rectangular pieces one at a time and press around the basin's sides so that they fit together neatly, alternately placing wide and narrow ends up. If you can't quite fit the last piece of bread in it doesn't matter, just trim into a triangle, dip in juice and slot in. Now spoon in the softened fruit, adding the strawberries here and there as you go.

4. Let flavours mingle then serve: Dip the bread triangles in juice and place on top - trim off overhang with scissors. Keep leftover juice for later. Bring cling film up and loosely seal. Put a side plate on top and weight down with cans. Chill for 6 hrs or overnight. To serve, open out cling film then put a serving plate upside-down on top and flip over. serve with leftover juice, any extra berries and cream.

Tips:

Berries over cooked or white patches?
The best thing to do is add more berries, strawberries are best. If your bread is patchy, take the spare juice and spoon it over - people will never know.

The sugar in the pan won't dissolve?
It takes a lot longer than you might think to dissolve caster sugar. Be patient and keep the heat low. It's ready when there's no grittiness at the bottom when you stir.


4.30.2010

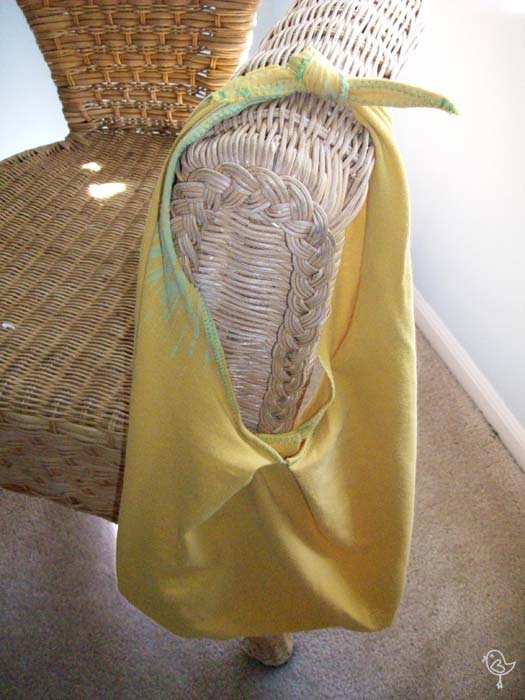
Freebie Friday: Upcycled T-shirt Tote Tutorial

Upcycled T-Shirt Tote


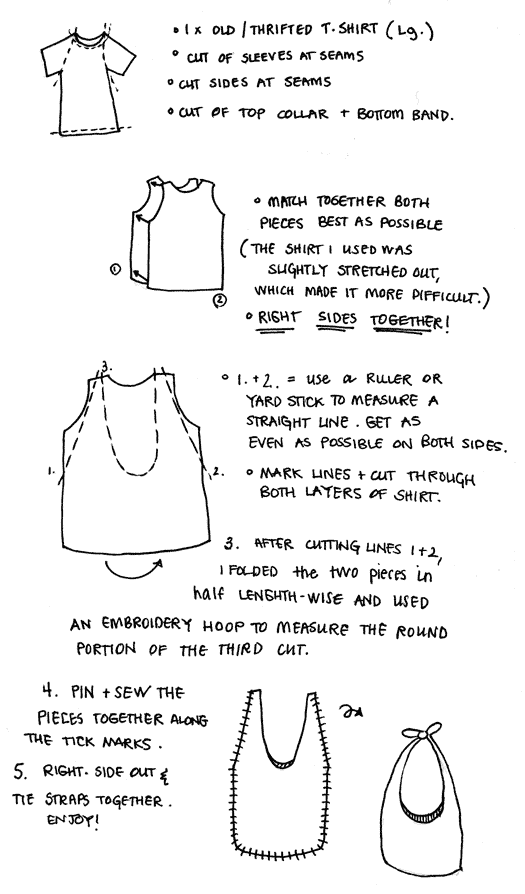
My sister and I love, love, LOVE to brainstorm. Whether it's a new little something to sew, products to source, or packaging, she has the eye for design, an ear to listen, and one heck of a contributing voice! Out of one of those sessions comes this fun, cheap, and easy DIY project. Turn any old t-shirt into an easy tote bag - perfect for the beach, playground, or park. I don't have much experience in pattern making, so I'll do my best to walk you through the tutorial...please ask questions if something's unclear. Enjoy :o)


tshirt-tote-tute1
Above, you'll see the basic instructions for my t-shirt tote bag. 
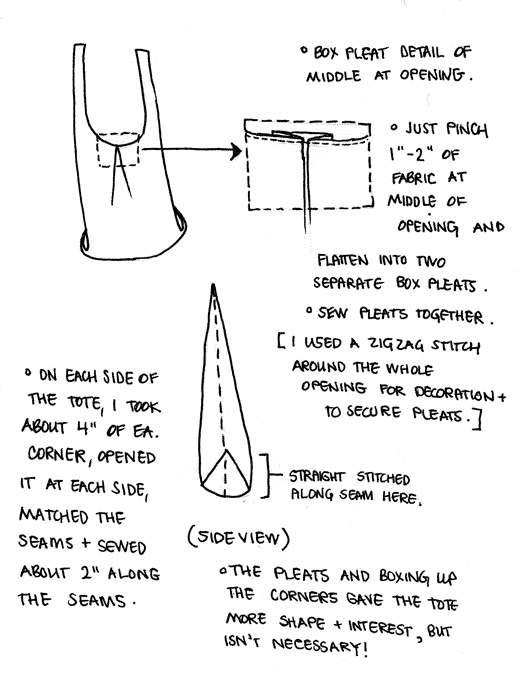
Below, I've listed a few extra details I've done to jazz up my finished tote (top image.)
tshirt-tote-tute2


Have you used this tute to make a tote of your own? I'd love to see your finished product! Email me at reevetobe{at}gmail{dot}com and I'll happily share your photos with the world!

xo,
Evelyn

p.s. This tutorial + pattern are for your personal use only, please. Share and share alike, but please give me credit when reposting!

4.23.2010

Freebie Friday: Yogurt + Berry Ice Pops

I need to come clean about something...and that something is my insatiable sweet tooth. This month, I've single-handedly polished off two containers of Edy's Slow Churned and now I'm onto a pint of Haagen Dasz peach fro yo. Seriously, I'm out of control! For the sake of argument, I'm blaming stress...ahem.

The point of it is this: I need a healthier (not to mention cheaper) substitution and fast! (Sure, I could just give it up, but where's the fun in that?!) Somewhere in a recent issue of Body + Soul magazine, they showed perfectly delectable homemade berry fro yo pops. Alas, I can't track down that exact recipe, but I did find two pretty rockin' replacements. I don't have a mold, though, so I may have to get a little creative in that department whilst keeping eyes peeled at the thrift store. I can't wait to give these a try!

1. Tie Dye Pops

2. Raspberry Yogurt Ice Pops

Anyone ever made something like these frozen yogurt pops before? Any advice? I'm also on the look-out for old-fashioned frozen pudding pops recipe a la Bill Cosby. Hook a girl up if you know a good one!

4.16.2010

Freebie Friday: A Darn Good Lesson

{LIFE via Google}
Yep. That was a pun. Today's freebie is a lesson on how to darn. Aren't you excited?! For years I was fascinated with the seemingly antiquated necessity to darn things, especially socks. I mean...socks. If they get a hole, you buy a new package and toss the old ones, right? Not necessarily. Now those holey items may be given a bit more life, thanks to Penny Sanford's handy dandy darning instructions. Now that I grasp the process of darning,  I finally get to use my grandmother's old darning eggs! Once a favorite to play with (my grandma's sewing room was full of mystery and imagination and was one of my favorite play places), those darning eggs are living in my office, upon a shelf, inside the basket I wove on my honeymoon in Jamaica. My grandma would love that.

So here you go. A quick + dirty guide to darning. Give it a go before you toss out that old favorite!

And in case you'd like one more tutorial, Craftzine offers a pretty good one, too (with great photos for darning things other than socks.)

4.09.2010

Freebie Friday: How to Recycle Anything

 {handspun newspaper yarn by Greetje van Tiem, via greenupgrader.com}
We all can't call ourselves masters of recycling or, as I prefer, "green goddesses". Honestly, I don't even come close, despite my efforts. So, if you're anything like me and could use a little cheat sheet in the way of determining whether or not you can recycle a deodorant stick, plastic hangers or phone books, never fear! Real Simple has a fantastic, extensive list of items you can recycle (and all the whats, whys and hows, too. Yes!) This is one bookmark-worthy list, let me tell ya.

For instance, did you know that Nike offers a program that allows you to donate any brand of old sneaker to then be recycled into courts for various sports for children's programs?

or

Did you know that no take-away containers, not even the paper ones from Chinese restaurants, are recyclable and neither are toothbrushes? Talk about needing biodegradable alternatives!

If you're looking for hints on how to set up a recycling station at your house, check out Real Simple's great article on just the thing right here. We're trying to work out the perfect place in our kitchen and are considering removing some shelves in our pantry and involving some kind of pull-out recycling bins like these.

What kind of recycling system do you have set up in your home?

4.02.2010

Freebie Friday: Amigurumi Bunny Egg Cosy

These little cottontails will be making their way to my two nieces this Sunday, but instead of real eggs, they'll be accompanied by chocolate Cadbury's eggs (which are just way more fun to give!) Not bad for about an hour per bunny, a bit of scrap yarn, embroidery floss, and plaid grosgrain ribbon. I used Lion Brand Yarn's free pattern found here. (*note: you do have to register to view their patterns, but it's more than worth it. No spam and tons of great free projects!)

Prior to this project, I had never made pom-poms before, but I really liked how they turned out. I mean, what's a bunny without a pouf for a tail? I used Bella Dia's easy peasy tutorial here for help.

I'm signing out for the weekend. I wish for you this weekend a renewal of spirit, peace in your hearts and smiles on your faces. Please do not let the sentiment of the season be lost in chocolate eggs and plastic grass. Rebirth, renewal, and resurrection all go hand-in-hand. Whether we're talking about nature or faith, it's really all the same language. Here's to enjoying the friendships you have, hugging loved ones and giving thanks!

3.19.2010

Freebie Friday: 2 Super Cute Japanese Bag Tutes

japanese-bags-tutorial

I came across these two tutorials and loved them so much, I had to share. The illustrations are almost cuter than the bags, don't you think? The little lumpy cat-dog-bear animal with the apple on its head? C'mon, that's just adorable! Sure wish I could read the instructions, but I think that anyone with intermediate sewing skills can follow along. Can't wait to give it a try myself!

tutorial 1: one-handle loop satchel (top)

tutorial 2: two-handled bag (bottom)

Happy weekend!

3.12.2010

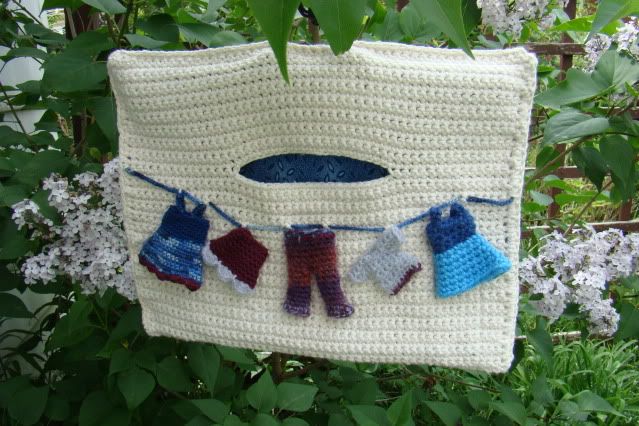
Freebie Friday: Crochet Clothespin Bag Pattern

Crochet Clothespin Bag


{courtesy sukigirl}

Is this not the cutest clothespin bag you've ever seen? Those miniature crocheted clothes (which Sukigirl also offers a pattern/tute for here) really are adorable. I especially love this crochet clothespin bag pattern because it is a great beginner crochet pattern (because, really. Who wants to crochet a gazillion scarves because you don't know what else to make?) Trust me, I've been there. This is a way more practical and easy pattern for newbies! (Special thanks to sukigirl for the great pattern. Love it!)

So, what could make this handy bag that much better? Why not whip up some plarn and crochet a more weather-proof version, perfectly suited for living outside on your clothes line? (FYI: "plarn" is yarn made from plastic grocery store bags...pure genius and super easy to make. Give it a try here.)

This is definitely on my top list of projects for myself. Now that the weather is warming and spring is officially just a couple weeks away, I'm itching to get a clothesline up. This clothespin bag will be a great addition, don't you think? 

Happy weekend, everybody :)

3.05.2010

Freebie Friday: nani IRO 2010 Patterns

Nani_Iro

There is such a lovely, inspiring simplicity to nani IRO patterns and fabric, isn't there? Textile designer Naomi Ito makes me love the idea of sewing every day. A perfect, breezy summer tunic here or a  mommy-and-me apron set? I can't lie. I long for the day when I can whip up darling little frocks for my own wee brood. Until then, I have to live vicariously through all you hot craft mamas out there!

To take the legwork out of tracking down some seriously adorable patterns yourself, here are a few of my  favorite Nani Iro patterns, all courtesy of Kokka Japan.

note: patterns are in Japanese and metric, but it shouldn't stop you! 


Just click on an image below to open the corresponding pattern in another window. Enjoy!
nani_IRO-1

nani_IRO-2

nani_IRO-3

1.15.2010

{freebie friday} Retro Recipe Cards

OK everyone, it's time to take a quick look back into recent history. Remember this post? The one about the small hand I played in my bridal shower with the recipe cards I designed? I'm not sure I really, truly explained what a huge success it was for me. Though I haven't started the creation of my own family recipe album quite yet, all the recipes are in a tidy stack in a beautiful basket just waiting for me. And let me tell you what...these are some really delish recipes! Bubs just made his mom's Madras Curry the other night for dinner. It's crazy good. And my mom's Chicken Parm. And her mother-in-law's Blondies. Our aunts' Treacle Pudding and Rosemary Chicken. Sissy's improved version of Grandpa's Strawberry Pie. Like I said before,with a gift like that, who needs presents? I'll cherish these recipes forever and, hopefully, one day my kids and grandkids will, too.

That got me thinking. Whether you're looking to do something similar with your bridal shower (and I can't recommend it enough), are feeling generous with your recipes or have a potluck coming up, who wouldn't prefer a cute retro recipe card over a plain piece of printer paper or a boring index card? So, just for you, I share my retro recipe card template. Just click here for the template and save to your computer.

These modern-vintage recipe cards are 3 1/2 x 5" when folded with cute dotted lines for writing out all your recipe's details. They print 2-up on a standard 8 1/2 x 11" sheet of card stock (recommended.) Trim at the black lines and you're all set!  

{note: these are for personal use only. sharing is encouraged, but please link back & give credit! © oh my word! 2009}

12.21.2009

DIY LOVE: How To Wrap a Present

A number of years ago, I was lucky enough to work part-time at The Container Store while finishing up my degree at the Columbus College of Art & Design. Now, for those of you who aren't familiar with The Container Store, it's the destination for organization! Boxes, bins, and containers of every color, size and shape, great gadgets for the office, bath and kitchen and (my favorite) a gift wrap section to die for. To make it even that much more fantastic, at the holidays, they offer "Gift Wrap Wonderland", where they offer some of the cutest, best quality wrapping paper I've ever used (and I'm a paper snob, for serious.)

Being The Container Store cheerleader that I am, I was given the important task as one of the elite gift wrap and bow-making demonstrators during Gift Wrap wonderland. It was so much fun! Every 20 minutes or so, we'd do a demo showing shoppers how to beautifully wrap gifts and make completely fantastic ribbon bows. To this day, I use these tips like crazy.

With Christmas just a few days away, you may not have time to pop into your nearest store for a demo, so here's a few tips to help you along the way. Happy gift wrapping!

P.S. If you want video tutorials, click here!

How To Wrap a Gift

Essentials:
· rolling scissors
· double-sided tape
· boxes (you want the items to fit in well)
· good quality/weight paper (grid-backed paper rocks!)

1. Lay the box face down on the paper. Use a ribbon or tape measure to measure the girth of the box and add two inches. This is how much paper you will need to go around the box. To determine how much wrap you will need to cover the ends of the box, allow an overlap that's equal to the height of the box and trim the excess paper accordingly.

2. For best results, the seam of the paper should be at the edge of the bottom of the package, rather than along the center. Pull one side of the wrap all the way to the other edge of the box, crease it slightly to mark the edge, then fold the crease for a clean look. Secure the edge with three small pieces of double-sided tape. Crease the bottom edges of the box with your thumb and forefinger.

3. Flip the box so that the top is facing upward. Place a small piece of double-sided tape near both sides of the end of the box. Push in on both ends to fold the wrap; it will be held in place by the double-sided tape.

4. For a finished look, fold the top edge of both the top and bottom flaps to ensure a straight, crisp line.

5. Tape the flaps to the box with three small pieces of double-sided tape.

How To Add a Bow

Essentials:
· Ribbon to match gift wrap
· scissors

6. To add the ribbon, start with the box facing top side up. Using a spool of uncut ribbon, wrap the ribbon around the length of the box and bring the spool back to the center. Be sure you‘ve left enough at the end to tie a bow or secure a handmade bow.

7. Cross the end and the spool of ribbon at the top of the box, then wrap the spool around the width of the box. Measure a length of ribbon from the spool that‘s approximately the same as the length of the first end, and cut.

8. Tie the two ends together in a knot at the center. Now you’re ready to add a bow for a complete presentation.

Click here for lots of bow tutorials & other great presentation ideas!

{all images & instructions courtesy The Container Store}

12.17.2009

DIY LOVE: Kids Holiday Countdown Calendars


Loving these Christmas and Hanukkah countdown calendars. Just print, color, cut, glue and hang! Free instructions and templates here.

{source: The Long Thread via Alpha Mom}

12.16.2009

DIY LOVE: Vintage Angel Embroidery Patterns


These completely adorable kitschy cherubs are for all those crafty folks who love a vintage Christmas. Thanks to Floresita and her treasure trove of vintage transfers, we all get to enjoy these little angels! {Click here for the pattern.}

{Finished project by Sew It's For You}

12.15.2009

DIY LOVE: Ribbon Wreath

{image via sunset}

I don't know about you, but around here, we hate shed pine needles more than just about anything. Even with hardwood floors and daily sweeping, they manage to find hiding places until at least June!

Enter the ribbon wreath. A wire or foam ring, a few yards of cute ribbon, knot tying and some scissor skills and voila! A completely adorable, easy to make wreath that will match whatever decor you fancy most. I loooove this red and white polka dotty version. Isn't it darling? Make mini versions to display on door handles, hang on children's bedposts or at your kitchen window.

{image via sunset}

Need step-by-step instructions? Click here, here or here for slightly different versions.

12.14.2009

DIY LOVE: Pine Cone Bird Feeder

I love the little cardinals who live near my house. All year, they flutter and fly about, landing on my fence, trees and deck and sing their pretty song.

When I was a kid, I was in Brownies and once we made pine cone bird feeders for our winged winter friends, like the cardinal. If you're looking for a very cheap, fun, easy peasy (and kid-friendly) DIY project, consider making a few yourself! P.S. For just a little time and very little money, they would make great gifts from the wee ones, too, don't you think?

What you'll need:
· pine cones (see if you can find some around your neighborhood!)
· 2 plates
· butter knife
· peanut butter
· bird seed
· length of yarn or ribbon
· scissors

What to do:
· Cut a long length of yarn and find the middle.
· Slide the middle of the yarn into one of the top sections of the pine cone.
· Tie a knot to secure the yarn to the pine cone.
· Tie a knot in the end of the yarn to make a big loop for hanging the pine cone.
· Scoop some peanut butter onto one plate.
· Spread the peanut butter inside the pine cone and around the edges.
· Sprinkle the birdseed onto the peanut butter-covered pine cone (holding over the 2nd plate).
· Roll the pine cone in the extra birdseed that is on the plate.
· Hang the bird feeder on the tree & watch the birds enjoy their treat!

8.07.2009

Free Chocolate Friday!


TGIF with free chocolate from Mars Snackfood every Friday through October!

Just visit RealChocolate.com every Friday, starting at 9 a.m. EST, to try for a coupon good for a free full-sized package of Twix, Dove, 3 Musketeers, Snickers, Milky Way, or M&Ms.

(Don't wait though...there's a cap of 250,000 coupons per Friday.)
Related Posts Plugin for WordPress, Blogger...